
Contents
When to replace or align the drive belt
Before you start
Tools required
Instructions
When to replace the drive belt
The P3000 drive belt should operate for a long time without needing replacement. However, it can sometimes wear prematurely, especially if the belt and pulleys become misaligned.
The belt should be replaced immediately if it shows signs of wear. Common indicators are:
- The belt slips on the pulleys, and you have already checked the belt tension is correct. If the belt slips, it may present as a noticeable 'thunk' sound, or you may get a notification indicating that the RPM sensor or reversal sensor registered an unepxected reading.
- Fairly rapid, regular 'clicking' noises from the drive chain.
You may also need to remove the belt temporarily to access other parts, such as the pulleys, main axle bushings, or main motor.
Before you start
 DISCLAIMER
The information in this document is believed to be accurate and reliable. However, the manufacturer does not give any representations or warranties, expressed or implied, as to the accuracy or completeness of such information and shall have no liability for the consequences of the use of such information. The manufacturer is not liable or responsible for any problems arising from the attempted repair. The manufacturer reserves the right to make changes to information published in this document, including without limitation specifications and product descriptions, at any time and without notice. The manufacturer's products are not designed, authorized, or warranted to be suitable for use in applications where failure or malfunction can reasonably be expected to result in personal injury, death, or severe property or environmental damage. The manufacturer accepts no liability for inclusion and/or use of its products in such equipment or applications and therefore such inclusion and/or use is for the customer’s own risk.
SAFETY INSTRUCTIONS
-
Make sure the roaster is turned off before starting any maintenance work.
-
The power cord must be unplugged or the roaster fully isolated from the electrical supply before removing any panels.
-
Read the instructions in full before starting work, and follow the steps as instructed below
Tools required
- Flat-head screwdriver, coin, or similar to open front door
- 2.5 mm hex key
- 3 mm hex key
- 5 mm hex key
Instructions
Open the front door and remove the right-hand side panel
See instructions here.
Loosen the main motor driver
See instructions here. You do not need to disconnect the driver completely, just loosen it from the bracket and set it aside.
Remove the belt cover
Use a 3 mm hex key to remove the bolts securing the belt cover. Remove the belt cover and set aside.
Loosen the tensioner bracket
The tensioner bracket is held in position with two bolts. Use a 5 mm hex key to loosen the bolts, but do not remove them.
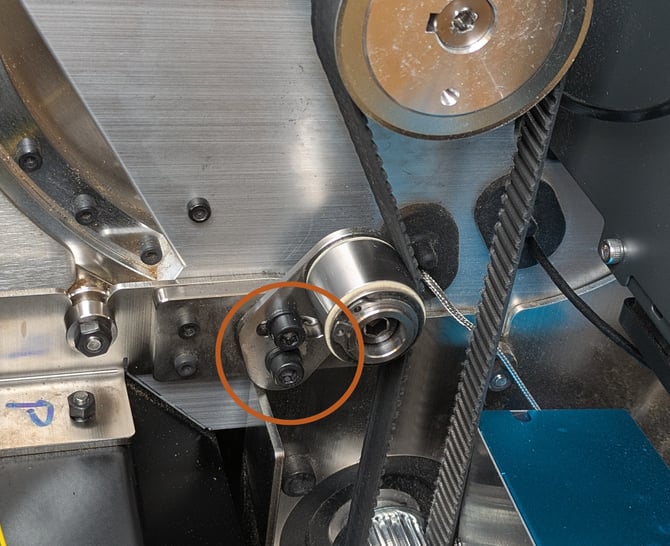
If you are only aligning the belt and not replacing it, then you should skip the next step and go straight to 'Adjust the belt alignment', below.
Remove and replace the belt
With the tensioner loose, you may be able to pull the belt off the pulleys directly.
If this proves too difficult, you can also remove the pulleys by loosening the grub screws holding them in place using a 2 mm hex key.
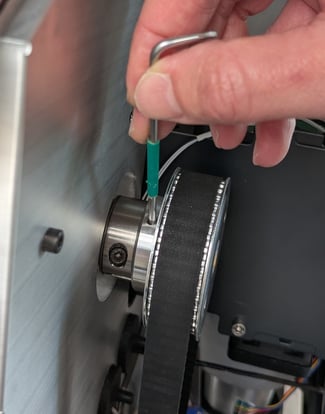
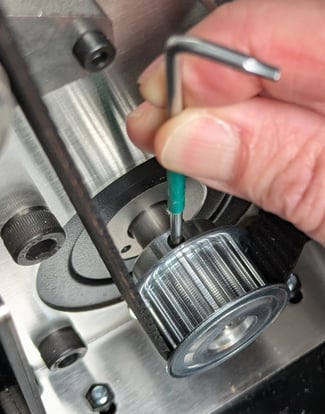
Slide the pulleys back onto the shafts if you removed them, and install the new belt. If you find it difficult to get the belt onto the pulleys, you may find it easier to remove the pulleys and put the belt onto the pulleys before sliding them into place.
Push the large, top pulley as close to the drum as possible and then tighten the grub screw to hold it in place. Leave the grub screw on the lower pulley loose, so that you can position it to align the belt correctly.
Adjust the belt alignment
Loosen the grub screw on the lower pulley using a 2 mm hex key, so that the pulley can slide on the axle.
Slide the lower pulley on the axle so it lines up with the upper pulley. In the correct position, the lower pulley may protrude slightly from the end of the motor shaft.
A straight edge can help you get the correct alignment. Once the pulleys are in line, tighten the grub screw on the lower pulley to hold it in place.
Once the pulley position is set, try turning the drum manually in both directions. Check that the edge of the belt does not protrude beyond the end of the tensioner wheel at any point during the rotation. If it does, then position the lower pulley slightly closer to the drum as needed.'''
Adjust the belt tension
To tighten the belt, push the tensioner towards the belt. The belt should have some tension, but be loose enough that you can easily twist the free side of the belt by 90 degrees using your fingertips.
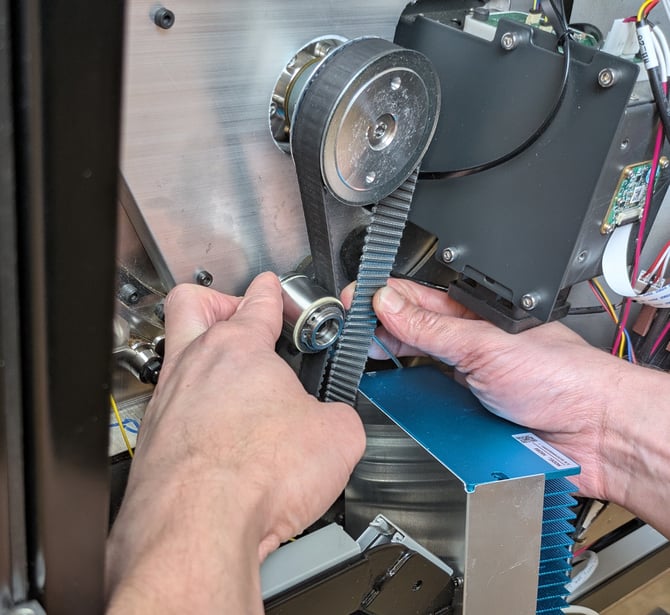
Once the tension in the belt is correct, tighten the bolts holding the tensioner bracket in place.
Double-check the tension and belt alignment after tightening the bolts and adjust if needed.
Finish up
Remount the belt cover using the three bolts.
Reposition the main motor driver and press into place until secured.
Replace the side panel and secure with the four bolts.
Close the front door.